Background
There are four fundamental interactions that occur in nature; in physics they are referred to as fundamental forces. The four forces are gravitational, electromagnetic, strong nuclear and weak nuclear. For this lesson we will focus on the electromagnetic force, specifically the force produced by an electric field (E).
The concept of the electric field is a bit esoteric compared to, let’s say, a gravitational field because we can interact much more easily with a gravitational field than we can with an electric field. If we take a ball (basketball, golf ball, baseball, etc.) and drop it, we see that it falls toward the Earth. This happens because the ball is in a gravitational field and the gravitational field produced by the Earth interacts with the mass of the ball. We assume, for the most part, that the gravitational field experienced by the ball is uniform, therefore, the ball falls straight from your hand to the ground. The force exerted by the field on the ball is F = mg (force =mass of the ball x gravity) Figure 1.
Uniform gravitational field, g
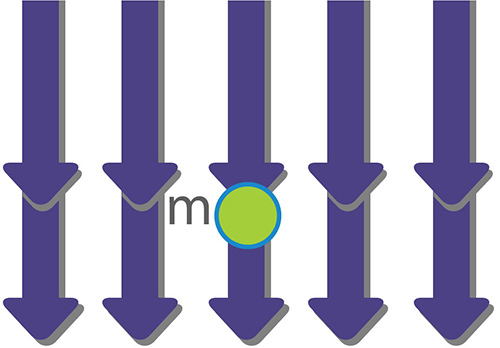
Gravitational field F∼ =m*g∼
Figure 1
An electric field is a bit different because in order to interact with the field you need to use what is commonly referred to by physicists as a test charge. In an electric field, a test charge is analogous to the ball in the gravitational field. If a test charge is placed in an electric field, it will move just like the ball moves in a gravitational field because the electric field interacts with the charge of the test charge in much the same way that gravity interacted with the mass of the ball in the previous example. An electric field is produced around any source of electric charge. Just as a ball can have different amounts of mass depending on the type of ball (baseball, basketball, etc…), a test charge can have different amounts of charge depending on the source. The unit used to measure the amount of charge in a test charge is the coulomb (C), akin to the unit of mass used for the ball, which is kilograms (kg). Another difference between electric and gravitational fields is that an object with mass always experiences a force in the direction of the gravitational field (i.e., down toward the floor for any object near the Earth’s surface). On the other hand, for an object with charge in an electric field, the direction of the force depends on whether the charge is negative or positive. Since we know opposites attract, a positive test charge will move toward the negative side of the electric field. Also, the shape of the field depends on the shape of the object producing the field. If you look at Figure 2 below, you will notice that a point charge produces a field that emanates radially from the point, whereas the two parallel plates that have charges placed on them produce a uniform field between them. As you may have noticed, the two parallel plates more closely resemble the uniform gravitational field from Figure 1, with the main difference being that the electric field can exist in any direction — unlike the gravitational field, which only moves down toward the Earth.
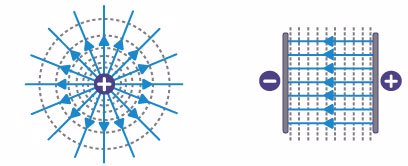
Figure 2
Why do this in your classroom?
- To help students understand electric fields, envision electric fields, test charges, forces and electrical potential.
- To help students make predictions based on evidence, make observations and draw conclusions.
- To allow students to manipulate variables and record data.
Materials
- Clear plastic tub (can be Tupperware, preferably large and flat about 1 x 2 feet)
- 4 wires with alligator clips (preferably); regular wire will also work
- Metal washers
- Two metal bars
- A volt meter
- 9-volt battery (or variable DC power supply if you have one)
- Graph paper (2 pieces)
Procedure
Follow these steps to do this activity. Watch the video below for a demonstration.
- Label the graph paper (numbers on the rows and letters on the columns).
- Place the graph paper under the tub.
- Fill the tub with about an inch of water.
- Place the two metal rods (or washers) in the tub at the edges of the graph paper (you should be able to see the graph paper through the bottom of the tub).
- Connect the positive end of the battery to one of the rods using a wire.
- Connect the negative end of the battery to the other rod using a wire.
- Connect the negative end of the volt meter (the black lead) to the rod in step 6.
- Use the positive end of the volt meter as your test charge.
- Try placing the positive lead (red lead) somewhere in between the two rods.
- You should get different readings on the voltmeter depending on where you place the lead.
- If you place it near the positive rod you should get a reading close to 9 volts, and if you move it toward the negative rod your volts should go down.
- Place the test charge somewhere between the two rods and record the location and amount of volts (for example; 7.5v at B8). Then mover the test charge to a different location until you find the same voltage and record the location and amount again. Continue doing so until you have at least five points. Then draw a line connecting the points. Continue to do this using different locations in the tub until you have a good idea of what your field lines look like.
Video
For more information contact MagLab educator Carlos Villa.