Background
An electric motor consists of two parts, the stator and the rotor. In a motor, the stator is the part that remains motionless and the rotor is the part that moves. The basic principle for all working motors is the magnetic attraction and repulsion. Since a magnet no longer moves once it has attracted, a motor needs some way to manipulate the magnetic fields so that the magnets attract and repel continuously. One way to do this is to have the current changing directions. Since AC electricity alternates, it naturally reverses magnetic fields with each change.
Why do this in your classroom
- To encourage the following process skills for scientific investigation: prediction, observation, developing a hypothesis, and drawing conclusions
- To help students understand the relationship between electricity and magnetism
- To allow students to manipulate variables and record changes
Materials
- D battery
- #20 Copper magnet wire
- 2 Paper clips
- Rubber band
- Ring or disc magnet
- Sandpaper
Procedure
- Wind the magnet wire around the D battery. Leave a tail of 3-5 cm on each end. Gently remove the winds from the battery, and wind the tails around the opposite sides of the coil. The resulting shape should look like a circle with two lines extending from opposite ends.
- Use fine sandpaper to remove the insulation from one of the tails and only the top half of the opposite tail.
- Straighten out the tails so that they are exactly opposite from each other. This is done easiest if the coil is flat on the table. This will be your armature for your motor.
- Unfold the two paperclips and bend them into supports for the tails of the armature. These will suspend the coil over the battery/magnet assembly.
- Use a rubber band to hold one paperclip on each and of the battery (+ and -).
- Place a magnet one top of the battery side halfway between the two paperclip supports. The magnet should attract to the battery.
- Set the armature into the paperclip supports. Be sure that it is allowed to spin freely.
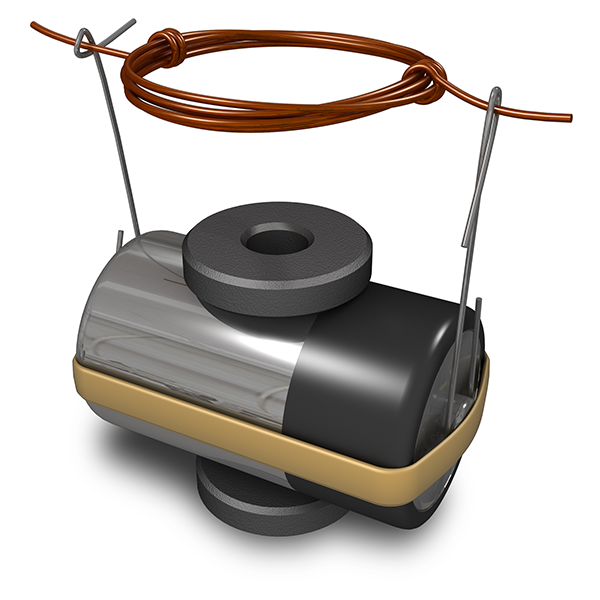
Your setup should look like this:

What’s happening
When the bare parts of the armature touch the armature touches the supports, current will flow and it will become an electromagnet. The armature will then react to the magnetic field from the permanent magnet and move. As it moves, the insulated part of the armature will come into contact with the supports and the current will stop, making the armature’s magnetic field disappear, which will again cause the armature to move. As it returns to its original position, the whole process will start again and repeat, causing continuous motion and creating an electric motor.
For more information contact MagLab educator Carlos Villa.