Background
Magnets are items with poles and a magnetic field. This is due to the configuration of its electrons. There are three metals that are naturally magnetic; iron, nickel, and cobalt. These metals allow the electrons to configure in such a way that magnetic fields are created around them, and it is this magnetic field along with the poles of the magnet, that allow magnets to attract and repel. When two opposite poles are brought together, they will attract. But when the same poles are nearby their fields will repel each other.
But while we call these permanent magnet, there really is nothing permanent about the fields. All magnets can be demagnetized, and there are multiple ways to do that. Temporary magnets are items that are magnetic but do not keep their field as strongly. Items in this group include paper clips, scissors, refrigerators, staples, and various other items. These items are much more likely to lose their magnetic field than are permanent magnets.
There are a few ways to remove a magnetic field from a permanent magnet. One of these methods requires increasing the temperature of the magnet. Another way to make a magnet lose its magnetic field is by hitting it.
Why do this in your classroom?
- To encourage the following process skills for scientific investigation: prediction, observation, developing a hypothesis and drawing conclusions.
- To help students understand magnets and what creates magnetism.
- To allow students to manipulate variables and explore their own questions.
Materials
- Stapler
- Strong magnet (alnico)
- 4 iron bolts
- Ruler
- Compass
- Masking Tape
- Hammer
- Freezer
- Toaster oven
- Cookie sheet
- Oven mitts
- Tongs
Procedure
- Ask a grown-up to open and close the stapler several times, without any paper, so closed staples slide out. We will use these as our attracting items.
- Now we will use the magnet to magnetize the bolts. Hold the bolt in the middle in one hand. Using your other hand, attach the magnet to the end of the bolt. Lift up, and repeat.
- Take the magnet and attach the other side of the magnet on the other side of the bolt so that you are attaching the opposite pole on the other end of the bolt. This will magnetize both ends of the bolt.
- To test the strength of your newly created magnet, try to attract some of the staples. You should be able to pick up at least three closed staples at the tip of the bolt. If it doesn’t attract at least three, remagnetize your bolt until you can.
- Using the other bolts, create three more weak magnets the same way. Use the staples to confirm that all your bolts are about the same strength.
- Put one of your magnetized bolts in the freezer for at least 30 minutes. At the same time, place another one of your magnetized bolts on a cookie sheet in a 350 degree oven. Why can’t you use a microwave to heat your nail?
- While waiting for the bolts to reach the right temperature, you can test the effect of striking one of your magnetized bolts. Lay a magnetized bolt flat on a hammer safe surface and ask a grown-up to hammer the bolt on the table twenty times. Now, see how many staples the bolt can pick up.
- Now ask a grown-up to help you remove the bolt from the toaster oven using the oven mitt, and remove the bolt from the freezer using the tongs.
- Quickly test these two to see how many staples they can pick up.
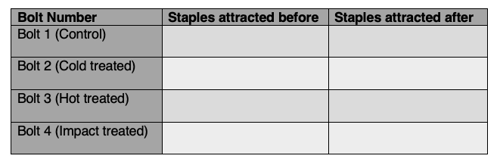
- Record your results in a data table.
- Repeat your experiment.
What's happening?
Your results will depend on the strength of the magnet you are using to turn the bolts into magnets. Most of the bolts should be noticeable weaker, but not all of them. Heat and impact are two ways to demagnetize an item, so the bolt that were hit by the hammer and the bolt that was placed in the oven should both be weaker. But time and cold should not affect the bolts. So the control bolt and the freezer bolt should both be about the same strength.
When it comes to the creation of magnetic fields, the spin of a material’s unpaired electrons is the crucial element. In most materials, electrons spin randomly. But in magnets the electrons group into magnetic domains, created whenever the spin of a number of electrons line up in the same direction. This happens in iron, nickel, or cobalt. When the bolts are placed on the magnet, the bolts are being magnetized because their unpaired electrons are being organized. As long as they remain organized, the paperclips will act like magnets. But as soon as their order is disrupted, by hammering them or by heating them up, the magnetism is weakened and/or lost until a magnet is used to reorganize the electrons.
Video
For more information contact MagLab educator Carlos Villa.